


Overview
In Bangalore, for example, for an annual rainfall of 900mm over 60 rainy days and a roof area of 50 sq.m.
- A 500 litre rain barrel will collect around 23,000 litres of water per year
- A 1000 litre rain barrel will collect around 35,000 litres of water per year

Site specification
The site should have a minimum of 3'3" x 3'3" for 500 litre drum and 4'0" x 4'0" for 1000 litres
Preparation - Materials required
- PVC pipes – 75 mm dia for roof area upto 1000sqm – for gutter (horizontal pipe) and down pipes (in case of sloped roof. 150 mm dia pipe is cut horizontally to act as a gutter. Gutters can also be of aluminium, galvanized iron, or stainless steel).
- Clamps to be placed at 1 m c/c for holding the gutter in place (number of clamps depend on the length of the gutter and down pipe)
- Screws/ nails for fixing the clamps
- End cap for sealing off the other end of gutter, so that water does not flow out from the wrong end
- Elbows for joining the pipes at right angles (number of elbows depend on the design)
- Tee-joint for connecting the down pipe to first rain separator on one end and water inlet into the barrel on the other end
- First rain separator with PVC gate valve
- First rain separator allows the first rain water which usually carries a lot of suspended particles like leaves, dust, etc. to flow off without letting it into the barrel.
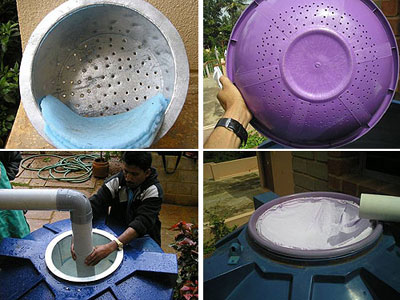
- Small perforated aluminum basket (which sits securely in the mouth of the rain barrel) with two layers of sponge to act as filter
- PVC drum – 500 litres or 1000 litres depending on roof area – for storing rain water
- Tap at the bottom of the barrel for allowing drawl of water in a bucket or by attaching a hose pipe
- Platform raised at a height of around 45 cm from the ground for keeping the rain barrel
Construction technique
Step 1
Lead all the water falling on the roof to one or two points in the roof. This can be
done during the time of construction by providing a slope in the required direction.
In already constructed houses connect the existing pipes to the rain barrel.
Step 2
Connect the roof outlet to the down pipe (vertical pipe).
In case of sloped roof, fix a gutter (horizontal pipe) along the edges of the roof using clamps. The gutter can be connected to down pipe using Elbow junction. Seal the other end of the gutter using end cap.

Step 3
Using tee junction at the end of down pipe, connect one end of the tee to the first rain separator and the other end to the inlet of the barrel.
Step 4
Construct the platform at a minimum of 45 cm above the ground. This allows you to get some water directly from the tap and keep the bottom of the barrel clean.
Step 5
Place the PVC barrel on top of the platform.

Step 6
You have to filter the water before storage. It can be anything that will prevent the solid particles from entering in the barrel.
For example, you can place a perforated aluminum basket with two layers of sponge or a perforated plastic bottle with a mesh at the mouth of the barrel.
Cost
- Rs. 3000 – for installing a 500 litre rain barrel
- Rs. 4000 – for installing a 1000 litre rain barrel
Caution
- Make sure that just before the first monsoon showers the roof is swept clean
- During continuous rainy spell it is advisable to clean the roof once in 5 to 7 days
- Water from the first showers, should not be harvested – it should be allowed to flow out through the first rain separator.
- Always keep the filters clean
Water quality
If all the hygiene precautions have been taken (roof and gutter clean, efficient filter), this water is generally fit for drinking. To ensure its quality, you will have to do some bacteriological test.
H2S Strip Test: If the water doesn’t turn black after 36 hours in the sun, it is drinkable.
What else is possible
- Using a hosepipe, the tap can be connected to the borewell or sump tank.
- Overflows from rain barrels can also be used for recharging the ground.


